Have a spare AspireOne sitting around not being actively used? With built-in wireless and webcam it can easily substitute for a dedicated wireless webcam. As the prices of these netbooks continue to drop they may even be better deals while providing the additional features of a display and full operating system.
I’ll be looking at using an AspireOne netbook with Ubuntu 9.04 netbook remix installed, other linux distributions should also work. For Windows netbooks I like the program Yawcam, that provides lots of functionality along with a GUI.
A quick search for ‘webcam’ in the Synaptic Package Manager will show a variety of available programs that support webcam capture with ftp uploads. I tried these but had little success.
- camstream – program hung when run
- camgrab – the AspireOne camera wasn’t found
- camorama – could not connect with the webcam
- camE – came the closest of the ‘webcam’ apps. captured images to disk, connected to the ftp server, but failed to complete uploads. I was not able to resolve the upload failure.
- vgrabbj – fails to connect to the webcam
- webcamd – sort-of worked. captured images, uploads worked. however it seemed to have upload troubles and be low on options and/or documentation.
The best program for webcam monitoring on linux is Motion. Install it using the Synaptic package manager. This will place sample configuration files in /etc/motion/motion.conf
Since I plan to occasionally use the netbook for casual surfing and want to keep an eye on the camera operations to easily stop it for privacy, I’ll run it as a user rather than in daemon mode. Copy the sample configuration to your user directory /home/<user>/.motion/motion.conf
I changed just a few settings to support uploading a snapshot every 60 seconds. I also disabled the motion images and videos for now. I’ll include these in a future setup, but for now the captures would quickly fill the small drive of the netbook if left running.
Edit the motion.conf file in your user ~/.motion directory and modify the following settings:
# turn of daemon mode, I'll run in a shell
daemon off
# optionally use a larger image size
width 640
height 480
# turn off motion capture images
output_normal off
# turn off motion video
ffmpeg_cap_new off
# take a picture every 60 seconds
snapshot_interval 60
# reuse the jpg image file name lastsnap
snapshot_filename lastsnap
# run an FTP upload script after taking a picture
on_picture_save /home/<user>/ftppicture %f
Motion does not include any FTP functionality, but it does provide a set of events that can be used to run external scripts. on_picture_save allows you to specify a script that will be run after each image is taken and stored to the local drive. Here we will run the script ftppicture, the contents of which are listed below:
#!/bin/sh
HOST='your.host.ip.addr'
USER='username'
PASSWD='password'

filename=${1##*/}

ftp -n $HOST <<END_SCRIPT
quote USER $USER
quote PASS $PASSWD
cd cams
put $filename
delete aspireone.jpg
rename $filename aspireone.jpg
quit
END_SCRIPT
exit 0
Fill in the constants at the top with your ftp server login information. This script will connect to the server, upload the file lastsnap.jpg , delete the image aspireone.jpg from the ftp site, then finally rename the new lastsnap.jpg to aspireone.jpg on the server.
From a terminal run the program with ‘motion’. Motion includes a web server, so you can view the live camera image for adjusting its postion by opening a web browser to http://localhost:8081
It will now take and upload images every 60 seconds. Stop the program with CTRL-C in the terminal and run motion to restart.
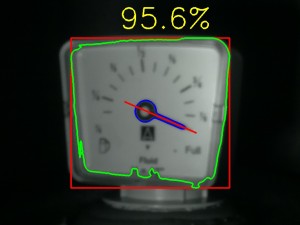
 The camera resolution is high enough that the Pi can be place back far enough to get a reasonable focus. The image will be cropped show the meter on the output.